This is the second post from the series explaining architecture of designing applications for Internet of Things, connecting devices and sensors with your line of business application like Microsoft Dynamics AX.
In the first post, we created Raspberry Pi system with Windows 10 IoT Core.
In this post, we will create a headless Universal Windows Platform (UWP) app that will control LED on our Windows IoT Device. UWP apps can run on any device running Windows including Windows Phone, phablets, tablets, laptops, PCs, compact devices such as wearables or household appliances etc.
Once we are done, we can control LED using IoTCoreWatcherTool.
![]()
![]()
![]()
![]()
![]()
![]()
![]() Note: You can ignore UI elements if you want to make it headless app. The code can be found here.
Note: You can ignore UI elements if you want to make it headless app. The code can be found here.
![]()
![]()
Join me on facebook and feel free to post your comments / feedback / queries.
In the first post, we created Raspberry Pi system with Windows 10 IoT Core.
In this post, we will create a headless Universal Windows Platform (UWP) app that will control LED on our Windows IoT Device. UWP apps can run on any device running Windows including Windows Phone, phablets, tablets, laptops, PCs, compact devices such as wearables or household appliances etc.
Once we are done, we can control LED using IoTCoreWatcherTool.
Hardware
- a LED (any color you like)
- a 560 Ω resistor (Resistor Color Code - Green, Blue, Brown, Gold)
- a breadboard
- 2 Male to Female connector wires
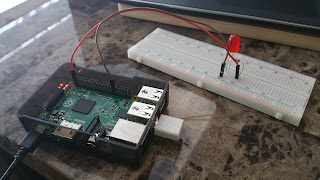
Connect LED to Windows IoT Device (RPi2)
- Connect the shorter leg of the LED to GPIO 5 (pin 29 on the expansion header) on the RPi2.
- Connect the longer leg of the LED to the resistor.
- Connect the other end of the resistor to one of the 3.3V pins on the RPi2.
- Note that the polarity of the LED is important. (This configuration is commonly known as Active Low)

Develop Universal Windows Platform app
Logic is straight forward, we will use a timer, and each time the 'Tick' event is called, we flip the state of the LED.
- Create a project using Visual Studio 2015 Community Edition, File - New - Project - Installed - Templates - Visual C# - Windows - Universal and select Blank App (Universal Windows).

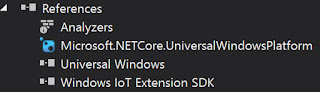
- Add reference to Windows IoT Extension SDK
- Modify MainPage.xaml.cs to add timer logic and GPIO pin handling.
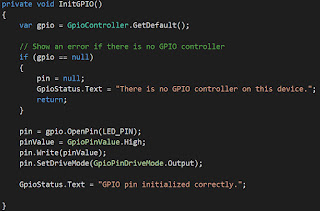
- Add Windows.Devices.Gpio namespace.
- Add private variables and constants.
LED_PIN is set to 5 for GPIO 5 - MainPage construct to initialize timer and GPIO pin.
Timer is set for 500ms to flip LED. - InitGPIO method initializes and gets the GPIO controller.
Use OpenPin method to open the desired pin (5).
Set the pin to OFF using pin.Write(GpioPinValue.High).
Get the output mode of the pin using SetDriveMode. - One we have pin's output mode, we can control LED by pin.Write(Low/High).
Low is to flow the current into the LED.
 |
| Private variable and constants |


Deploy App to RPi2
In visual studio, make sure the Solution Platform is set to ARM.
Select Remote Machine

Connect to Windows IoT Device using the device IP and authentication as None.

Press F5 from visual studio to deploy your app.
Ok, so now finally we have deployed our app to Windows IoT device and controlled one of the GPIO pin.
Enjoy. Next we will connect to a web API to control Windows IoT device and sensors.
Join me on facebook and feel free to post your comments / feedback / queries.