In this Blog we will walk-through how to add custom Domain/sub-domain in Azure web app with the help of GoDaddy.
Problem Statement:
We have a domain cloudfronts.in, purchased from GoDaddy and we want that it should point to website hosted on Azure.
We have divided this blog in two different parts.
Part 1: Add new custom Domain
Part 2: Add new custom Sub-Domain
Pre-Requisite:
- Azure Subscription with Web apps (Service administrator/Co-administrator)
- GoDaddy Account with new Domain (Admin)
Next we need to follow the steps given below
Steps 1: Login to your GoDaddy account with admin credentials and click on Manage domains.
Image may be NSFW.
Clik here to view.
Steps 2: Click on domain name that you want to configure. In Our case we want to configure for cloudfronts.in.
Image may be NSFW.
Clik here to view.
Double click on domain name and wait for new window.
Image may be NSFW.
Clik here to view.
Step 3: Click on DNS Zone file and then edit option.
Image may be NSFW.
Clik here to view.
Steps 4: We need some additional information from Azure web apps, that we will add in DNS configuration.
- Login to your Azure account and navigate to web site that you want to configure.
- Web site must be in share mode or standard mode to configure domain name. Change apps service plan pricing ties accordingly. Please refer following URL for more information http://azure.microsoft.com/en-in/pricing/details/app-service/
Image may be NSFW.
Clik here to view.
Navigate to Dashboard and click on Manage domains to add new custom domain name for your web site.
Image may be NSFW.
Clik here to view.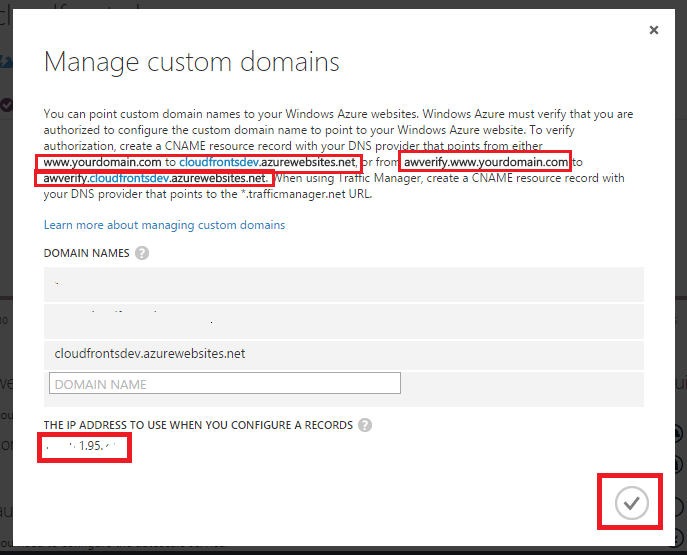
Steps 5: Copy IP address of Azure web site. This information will need, when we add DNS record in GoDaddy.
Image may be NSFW.
Clik here to view.
Steps 6: Add new A(Address) record and point to IP Address with below configuration.
- Record Type: A (Host)
- Host: @
- Point to: 192.198.15.14 (Azure website IP Address)
If @ record in already present, then edit that record.
Image may be NSFW.
Clik here to view.
Add new CName record with below configuration.
- Record Type: CNAME (Alias)
- Host: www
- Point to: cloudfrontsdev.azurewebsites.net (Domain Name of Azure website)
Kindly edit this record if already present.
Image may be NSFW.
Clik here to view.
Steps 7: Add CNAME(Alias) record that will point to Azure website. This information is required by azure for verification purpose.
Add two CNAME(Alias) record given in Image.
- Record Type: CNAME(Alias)
Alias Name: awverify.www
Points to Host Name: awverify.cloudfrontsdev.azurewebsites.net - Record Type: CNAME(Alias)
Alias Name: awverify
Points to Host Name: awverify.cloudfrontsdev.azurewebsites.net
Image may be NSFW.
Clik here to view.
Image may be NSFW.
Clik here to view.
Steps 8: Save all changes by clicking on Save Zone File.
Image may be NSFW.
Clik here to view.
It might take 10-15 mins to update DNS entry.
Steps 9: Add domain name in manage domain section(Azure) and click on ok.
Image may be NSFW.
Clik here to view.
Reference
https://azure.microsoft.com/en-in/documentation/articles/web-sites-custom-domain-name/
The post Setup custom domain and sub-domain name in Azure/GoDaddy Part -1 appeared first on CloudFronts - Dynamics CRM | AX | BI.
Image may be NSFW.Clik here to view.